-Please scroll down for English-
Moses có thể ví như 1 hệ thống phổ biến dùng trong dịch máy, nhưng lại khá khó khăn trong cài đặt. Bài viết này hướng dẫn bạn cách cài đặt Moses cho người mới biết, đủ để sử dụng mà không cần quan tâm đến các tham số phức tạp. Nhưng về lâu dài, bạn cần nắm rõ tuning để đạt được tham số tối ưu (điều mà mình đang cần ai đó chỉ giáo :)) ).
Chuẩn bị:
- Cài đặt aligment tool: GIZA hoặc MGIZA.
- Cài đặt language model: SRILM.
- Cài các Ubuntu package.
sudo apt-get install build-essential git-core pkg-config automake libtool wget zlib1g-dev python-dev libbz2-dev
Cài đặt:
Mở Terminal
git clone https://github.com/moses-smt/mosesdecoder.git
cd mosesdecoder
Để compile cần Boost, tuy nhiên có phiên bản bị lỗi. Người phụ trách Moses(anh Hieu Hoang) đề xuất bản 1.55, nhưng mình cài và lỗi, do đó sử dụng bản 1.60. Quyết định là do bạn, nhưng có thể đúc kết được là nếu không compile được thì khả năng cao là do phiên bản Boost không tương thích. Mục đích của việc cài nhiều dòng lệnh boost là để cài đặt tại thư mục riêng, nhờ đó khi sử dụng đền không cần sử dụng quyền superuser.
wget http://downloads.sourceforge.net/project/boost/boost/1.60.0/boost_1_60_0.tar.gz
tar zxvf boost_1_60_0.tar.gz
cd boost_1_60_0/
./bootstrap.sh
./b2 -j4 --prefix=$PWD --libdir=$PWD/lib64 --layout=system link=static install || echo FAILURE
Sau khi chạy mà thông báo SUCCESS là OK, không sẽ báo lỗi FAILURE. Đôi khi dù FAILURE bạn cứ tiếp tục cài thử xem sao, nếu có vấn đề thì mới cái lại Boost phiên bản khác :))
Bây giờ compile Moses
./bjam --with-boost=~/workspace/temp/boost_1_60_0 -j4
Thành công sẽ có thông báo SUCCESS trên Terminal.
Test thử :
Bạn có dữ liệu của bước thứ n-1, bây giờ tiếp tục chạy xem file kết quả có đúng như tiên đoán hay không.
cd ~/mosesdecoder
wget http://www.statmt.org/moses/download/sample-models.tgz
tar xzf sample-models.tgz
cd sample-models
~/mosesdecoder/bin/moses -f phrase-model/moses.ini
Vào đường dẫn “/mosesedecoder/sample-models/out”. Nếu xuất hiện 2 dòng sau tức là bạn đã cài đặt thành công.
This is a small house
This is a small house
Thiết lập và chạy thử:
Việc thiết lập và cài đặt Moses rất phức tạp và nhiều công đoạn. May mắn thay có 1 shortcut là dùng EMS. Mình sẽ trình bày cách sử dụng bên dưới.
a) Cài đặt một số package:
sudo apt-get update
sudo apt-get install imagemagick --fix-missing
sudo apt-get install graphviz
sudo apt-get install gv
b) Tạo folder:
Mình chọn aligment tool là GIZA++ và language model là SRILM.
- FolderA chứa corpus. Bao gồm: convTxt2Sgm.py, weight.ini(copy từ “/mosesdecoder/scripts/ems/example/data”), data.en, data.vn, test.en, test.vn(4 file này thực chất là 2 file song ngữ, nhưng chia ra theo tỉ lệ bạn muốn, data dùng để train và test dùng để test. Sau này có thể tạo cả file validate khi tuning). Đường dẫn: “/home/phdlab/Desktop/HoXuanVinh/Corpus”.
- FolderB chứa GIZA. Bao gồm: GIZA++, mkcls và snt2cooc.out. Đường dẫn: “/home/phdlab/mosesdecoder/tools”
- FolderC(không cần tạo) chứa file “experiment.perl”. Đường dẫn: “/home/phdlab/mosesdecoder/scripts/ems”
- FolderD là working directory, mọi kết quả khi chạy đều lưu tại đây. Đường dẫn: “/home/phdlab/Desktop/HoXuanVinh/Vinh”
c) Chuẩn bĩ dữ liệu để chạy trong FolderA:
Giả sừ bạn đã có 2 file “source.txt” và “target.txt”, bạn sẽ dùng code tại đây để tách chúng ra thành 2 tập train và test. Như vậy giả sử chúng ta có 2 file song ngữ Anh-Việt thì ta đổi các file đã có sang tên sau:
- data.en: Dữ liệu tiếng Anh dùng để train
- data.vn: Dữ liệu tiếng Việt dùng để train
- test.en: Dữ liệu tiếng Anh dùng để test
- test.vn: Dữ liệu tiếng Việt dùng để test
Sau đó cần biến đổi file test cho đúng format quy định.
Dùng Terminal di chuyển đến FolderA và gõ lệnh sau:
python convTxt2Sgm.py -src test.en -ref test.vn
d) Chỉnh config:
Vào “/home/phdlab/mosesdecoder/scripts/ems/example”, bật file config.toy và edit.
Dòng 9(FolderD):
working-dir = /home/phdlab/Desktop/HoXuanVinh/Vinh
Dòng 13-15:
input-extension = en
output-extension = vn
pair-extension = en-vn
Dòng 20(folder chứa moses), 29(folder chứa file thực thi của GIZA/MGIZA):
moses-scr-dir = /home/phdlab/mosesdecoder
external-bin-dir = $moses-src-dir/tools
Dòng 32 (nếu chọn srilm thì thêm dấu # trước irstlm, randlm):
working-dir = /home/phdlab/Desktop/HoXuanVinh/Vinh
Dòng 42(FolderA):
toy-data = /home/phdlab/Desktop/HoXuanVinh/Corpus
Dòng 92(chọn số cores):
cores = 8
Dòng 141, 142, 150(Thiết lập thông số cho SRILM và comment các language model còn lại):
lm-training = $srilm-dir/ngram-count
setting = "-interpolate -kndiscount -unk"
order = 5
Dòng 198 – 220, 486-513 (khi sử dụng Tuning thì bạn chỉnh tham số tại đây , còn không thì cứ bỏ qua).
Dòng 292. Nếu sử dụng MGIZA thì thêm tham số theo bạn muốn:
training-options = -mgiza -mgiza-cpus 8 -sort-parallel 8 -cores 8 -parallel
Dòng 317. Uncomment.
Dòng 657, 665:
input-sgm = $toy-data/test.$input-extension.sgm
reference-sgm = $toy-data/test.$output-extension.sgm
e) Chạy:
Dùng Terminal di chuyển vào folderC. Gõ:
./experiment.perl -config example/config.toy -exec
Khi chạy thì sẽ có biểu đồ cho biết Moses đang chạy tới module nào, nếu module hóa đỏ tức mô hình gặp lỗi. Bạn bình tĩnh vào “FolderD/steps”. Bạn sẽ thấy các folder đánh thứ tự từ 1 trở đi. Số thứ tự cho biết đó là lần chạy thứ mấy. Giả dụ bạn bị lỗi lần chạy đầu tiên thì vào folder “1”. Nhìn vào sơ đồ thấy tên module nào màu đỏ thì tìm file tương ứng với đuôi .STDERR, mở lên và dò lỗi trong đó.
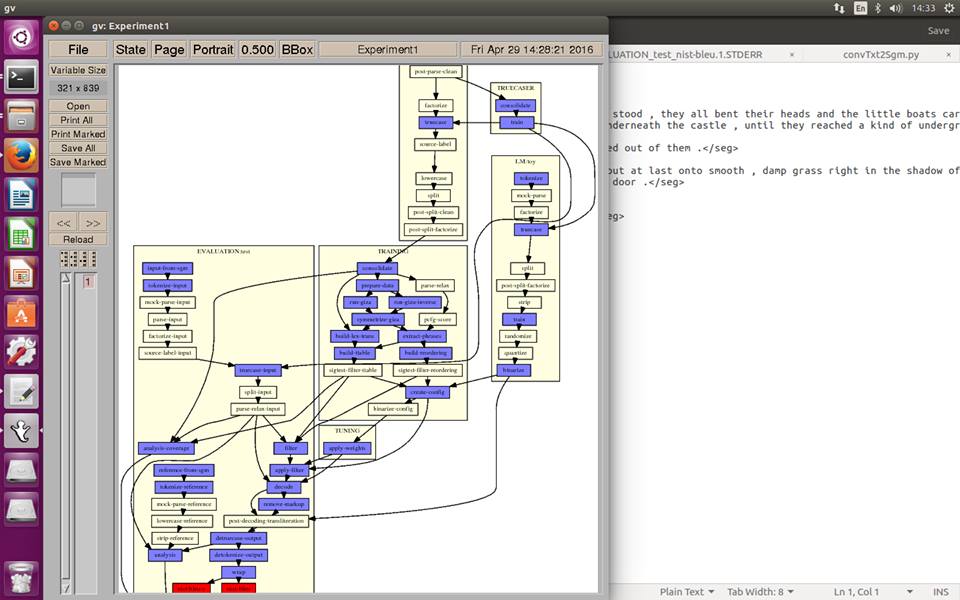
Biểu đồ và module màu đỏ cho thấy bị lỗi.
Kết thúc chúng ta mở FolderD, folder evaluation, tìm file “test.output”(xem kết quả test) và “test.nist-bleu” (để xem độ đo BLEU về kết quả gióng hàng). Chúc bạn thành công.
Lưu ý:
- weight.ini là file lưu trọng số khởi tạo của mô hình. Nếu quen thì bạn dùng tuning để tự học weight.
- Website gốc cho biết với ngữ liệu 130.000 cặp câu thì kết quả gióng hàng thấp, do đó khi chạy cần ngữ liệu thật lớn và sạch.
- Trường hợp gặp lỗi mà không biết phải làm sao, mở file “train-model.perl” trong “mosesdecoder/scripts/training” để dò lỗi argument và thông báo lỗi trong file STDERR.
Tham khảo:
- http://www.statmt.org/moses/?n=Moses.Baseline
- http://www.statmt.org/moses/?n=Development.GetStarted
- http://www.statmt.org/moses/?n=FactoredTraining.EMS
- https://gist.github.com/lngvietthang/907b74187b88994cb6ee77820a9bdf6d
Moses is popular system in statistical machine translation, but quite hard to install. This post helps amateur to get used to with Moses for the first time, enough to use without caring about complex parameters. But if you want to improve your system, more understanding about tuning is required to achieve best result (which is the problem I am dealing with :)) ).
Preparation:
- Install aligment tool: GIZA or MGIZA.
- Install language model: SRILM.
- Install Ubuntu package.
sudo apt-get install build-essential git-core pkg-config automake libtool wget zlib1g-dev python-dev libbz2-dev
Installation:
Open Terminal
git clone https://github.com/moses-smt/mosesdecoder.git
cd mosesdecoder
To compile you need Boost, however there is version you could crash your compile process if use it. The person in charge of Moses(Mr. Hieu Hoang) suggests using 1.55, I am fond of 1.60. So if anything goes wrong, the problem might be Boost version is incompatible. The purpose of using many lines for boost is to install in private folder, not in system folder. So you don’t need superuser authority to run.
wget http://downloads.sourceforge.net/project/boost/boost/1.60.0/boost_1_60_0.tar.gz
tar zxvf boost_1_60_0.tar.gz
cd boost_1_60_0/
./bootstrap.sh
./b2 -j4 --prefix=$PWD --libdir=$PWD/lib64 --layout=system link=static install || echo FAILURE
After running, if it says SUCCESS then OK, otherwise FAILURE. However, if it is FAILURE, you just keep doing the next step to see if something goes wrong. If so, come back to reinstall Boost with different version :))
Now compile Moses
./bjam --with-boost=~/workspace/temp/boost_1_60_0 -j4
If success, there will be a “SUCCESS” line on Terminal.
Test :
You will have data of step n-1, now try to run nth step to see if the result as we expect.
cd ~/mosesdecoder
wget http://www.statmt.org/moses/download/sample-models.tgz
tar xzf sample-models.tgz
cd sample-models
~/mosesdecoder/bin/moses -f phrase-model/moses.ini
Go to “/mosesedecoder/sample-models/out”. If 2 lines below show up, then congratulate, you have successfuly installed Moses.
This is a small house
This is a small house
Configuring for real run:
This step is extremely complicated. Fortunately, we have a shortcut is EMS.
a) Installing some packages:
sudo apt-get update
sudo apt-get install imagemagick --fix-missing
sudo apt-get install graphviz
sudo apt-get install gv
b) Create folder:
I choose aligment tool is GIZA++ and language model is SRILM.
- FolderA contains corpus. Including: convTxt2Sgm.py, weight.ini(copy from “/mosesdecoder/scripts/ems/example/data”), data.en, data.vn, test.en, test.vn(These 4 files actually are 2 billingual corpus, but split in ratio 9:1 for training and testing, .data for training and .test for testing. You can also create validate file for tuning). Directory: “/home/phdlab/Desktop/HoXuanVinh/Corpus”.
- FolderB contains GIZA. Including: GIZA++, mkcls and snt2cooc.out. Directory: “/home/phdlab/mosesdecoder/tools”
- FolderC(do not need to create) contains “experiment.perl”. Directory: “/home/phdlab/mosesdecoder/scripts/ems”
- FolderD is working directory, all results when running are saved here. Directory: “/home/phdlab/Desktop/HoXuanVinh/Vinh”
c) Preparing data for running in FolderA:
Assumes you had 2 files “source.txt” and “target.txt”, you will use code here to split them into trainining set và test set. If we have 2 billingual corpus English-Vietnamese, then their names will be:
- data.en: English corpus for training
- data.vn: Vietnamese corpus for training
- test.en: English corpus for testing
- test.vn: Vietnamese corpus for testing
Then convert .test file as format of Moses.
Open Terminal, move to FolderA and type:
python convTxt2Sgm.py -src test.en -ref test.vn
d) Configuration:
Go to “/home/phdlab/mosesdecoder/scripts/ems/example”, open file config.toy and edit.
Line 9(FolderD):
working-dir = /home/phdlab/Desktop/HoXuanVinh/Vinh
Line 13-15:
input-extension = en
output-extension = vn
pair-extension = en-vn
Line 20(folder contains moses), 29(folder containes executive files of GIZA/MGIZA):
moses-scr-dir = /home/phdlab/mosesdecoder
external-bin-dir = $moses-src-dir/tools
Line 32 (if choose srilm then comment out # irstlm, randlm):
working-dir = /home/phdlab/Desktop/HoXuanVinh/Vinh
Line 42(FolderA):
toy-data = /home/phdlab/Desktop/HoXuanVinh/Corpus
Line 92(number of cores):
cores = 8
Line 141, 142, 150(configure parameter for SRILM and comment out other language model):
lm-training = $srilm-dir/ngram-count
setting = "-interpolate -kndiscount -unk"
order = 5
Line 198 – 220, 486-513 (if Tuning then change here, otherwise pass).
Line 292. If use MGIZA, add parameter you want:
training-options = -mgiza -mgiza-cpus 8 -sort-parallel 8 -cores 8 -parallel
Line 317. Uncomment.
Line 657, 665:
input-sgm = $toy-data/test.$input-extension.sgm
reference-sgm = $toy-data/test.$output-extension.sgm
e) Running:
Open Terminal, move to folderC. Type:
./experiment.perl -config example/config.toy -exec
When running, a graph will shows you which module Moses is running, if it turns red then there is error. Keep calm and open “FolderD/steps”. You will see folder numbered from 1. The number tells the numerical order of the time you run Moses. If you meet error in the first time run, go to folder “1”. Look for error module with extension .STDERR, open and check the bug.
Process Graph and red module shows something is wrong.
At the end of the process, open FolderD, folder evaluation, look for “test.output” file(See test result) and “test.nist-bleu” (to check BLEU score and alignement result). Good luck.
Note:
- weight.ini is initialised weigth file of model. If know how to Tuning, then you can get the weight from there.
- Original Website says that with 130.000 pair of sentences, alignment result is quite low, which mean you need larger and clean corpus for better result.
- Whenever you get an error and confusing, open “train-model.perl” in “mosesdecoder/scripts/training” to check argument and error message in SDTERR file..
Reference:

Anh ơi cho em hỏi nó báo lỗi “No such file or directory” lúc chạy lệnh ./bootstrap.sh , hình như cái gói gz của 1_60 của anh không có file đó
LikeLike
Chào bạn, hiện tại mình đang chuyển sang dự án khác và không có thời gian để chạy lại kiểm thử. Tuy nhiên, mình đề xuất những cách thử như sau:
– Như đã nói ở trên, nếu báo lỗi thì cứ tiếp tục các bước tiếp theo xem thế nào.
– Bằng không, bạn thử theo package anh Hieu Hoang đề xuất – 1.55. À mà hồi mình chạy thử là Ubuntu 14 và 16 LTS nhé.
– Cuối cùng thì bạn chỉ còn cách binary search coi bản nào tương thích vậy.
– Nếu bạn dual-boot Window và Ubuntu, có khi chuyển folder sang phân vùng riêng của Ubuntu sẽ khác.
Chúc bạn may mắn. Nếu tìm được lỗi khắc phục thì bạn chia sẻ với mình, mình cũng sẽ cập nhật vào post luôn 😀
LikeLike
Anh ơi em thực hiện đến bước “Chuẩn bĩ dữ liệu để chạy trong FolderA:” rồi nhưng không biết làm thế nào để từ source.txt và target.txt mà chia thành 4 file như format ạ.
Em có chạy “python3 getFile.py” mà k thấy gì ạ. Anh ơi giúp em với ạ
LikeLike
Chào bạn, nếu bạn coi qua code trong “getFile.py” thì sẽ thấy nó đơn thuần làm công việc như sau: cho 1 file có a + b = n dòng, bạn muốn tách ra thành file train có a dòng và test có b dòng. Hồi đó mình cũng không viết cụ thể, khi nào có thời gian sẽ cập nhật lại cho đàng hoàng hơn.
Hiện tại để chạy được ví dụ trong Github, bạn cần có 4 file: arg.txt, getFile.py, source.txt và test.txt với số dòng bằng nhau. Giả dụ source.txt có 15 dòng, và bạn muốn chia train có 10 dòng và test có 5 dòng thì trong arg.txt gõ 2 dòng sau:
source.txt target.txt
10 5
Sau đó thì chạy “python getFile.py”.
LikeLike
Về ý tưởng của file thì em hiểu ạ. Tuy nhiên khi em gõ trong file arg.txt với 2 dòng:
source.txt target.txt
10 5
thì khi chạy python3 getFile.py (chạy với python2 không được ạ, nó báo lỗi “encoding = ‘utf8′” là tham số không hợp lệ). Thì nhận được kết quả làlà:
Traceback (most recent call last):
File “getFile.py”, line 67, in
a.readArgument(‘arg.txt’, ‘merge’)
File “getFile.py”, line 38, in readArgument
self._merge_file = lines[2]
IndexError: list index out of range
Khi em để nguyên file arg.txt khi mới clone project về và chạy thì không báo lỗi nhưng k thấy chương trình tạo ra các file mong muốn ạ. Em rất mong anh giúp đỡ em với ạ. Cảm ơn anh nhiều ạ
LikeLike
Bạn vào dòng 67 trong getFile.py, thay thế bằng dòng sau:
a.readArgument(‘arg.txt’, ‘split’)
LikeLike
Em đã sửa dòng dòng 67 như a chỉ dẫn. Chạy lại thì nhận được lỗi như này ạ:
Traceback (most recent call last):
File “getFile.py”, line 68, in
a.mergeFiles()
File “getFile.py”, line 47, in mergeFiles
with open(self._merge_file, ‘w’, encoding = ‘utf8’) as f:
FileNotFoundError: [Errno 2] No such file or directory: ”
File arg.txt của em như thế này ạ:
source.txt target.txt
10 5
LikeLike
Mình sơ suất, bạn chỉnh dòng 68 thành a.splitFiles() nữa.
Tóm lại, để split file thì hàm main như sau:
a = getFile()
a.readArgument(‘arg.txt’, ‘split’)
a.splitFiles()
Ngược lại, để merge file thì:
a = getFile()
a.readArgument(‘arg.txt’, ‘merge’)
a.mergeFiles()
Khi nào rảnh mình sẽ cập nhật lại Github sau.
LikeLike
– Em đã chạy được module split file theo hướng dẫn của anh ạ! Sau đó em có thực hiện config trong file config.toy như trong tut của anh. Sau khi config theo hướng dẫn thì em nhận được lỗi như sau ạ:
find: ‘/home/nguyenducthuan/Desktop/A/nc-5k*’: No such file or directory: (A ở đây là folderA như trong hướng dẫn của anh ạ)
– Em đã search trong file config.toy và tìm được 2 dòng sau chứa “nc-5k”:
line 116: raw-stem = $toy-data/nc-5k
line 189: raw-corpus = $toy-data/nc-5k.$output-extension
(nc-5k.fr và nc-5k.en là 2 file trong thư mục example/data, thì em đoán 2 file này là 2 file để train đúng không ạ ?)
Em đã comment dòng 116 và 189 và chạy lại thì nhận được thông báo sau ạ:
Unescaped left brace in regex is deprecated, passed through in regex; marked by <– HERE in m/^\[([^:]+):{ run
68 EVALUATION:test:tokenize-input -> run
65 CORPUS:toy:get-corpus -> run
63 CORPUS:toy:tokenize -> run
62 CORPUS:toy:clean -> run
58 CORPUS:toy:truecase -> run
52 TRUECASER:consolidate -> run
51 TRUECASER:train -> run
49 LM:toy:tokenize -> run
46 LM:toy:truecase -> run
42 LM:toy:train -> run
39 LM:toy:binarize -> run
38 TRAINING:consolidate -> run
37 TRAINING:prepare-data -> run
36 TRAINING:run-giza -> run
35 TRAINING:run-giza-inverse -> run
34 TRAINING:symmetrize-giza -> run
33 TRAINING:build-lex-trans -> run
30 TRAINING:extract-phrases -> run
29 TRAINING:build-reordering -> run
28 TRAINING:build-ttable -> run
25 TRAINING:create-config -> run
23 TUNING:apply-weights -> run
20 EVALUATION:test:truecase-input -> run
17 EVALUATION:test:filter -> run
16 EVALUATION:test:apply-filter -> run
15 EVALUATION:test:decode -> run
14 EVALUATION:test:remove-markup -> run
12 EVALUATION:test:detruecase-output -> run
11 EVALUATION:test:detokenize-output -> run
10 EVALUATION:test:wrap -> run
9 EVALUATION:test:reference-from-sgm -> run
8 EVALUATION:test:tokenize-reference -> run
4 EVALUATION:test:nist-bleu -> run
3 EVALUATION:test:nist-bleu-c -> run
2 EVALUATION:test:analysis -> run
1 EVALUATION:test:analysis-coverage -> run
0 REPORTING:report -> run
Warning: Cannot convert string “-*-Helvetica-Medium-R-Normal–*-140-*-*-P-*-ISO8859-1” to type FontStruct
Warning: Cannot convert string “-*-Helvetica-Medium-R-Normal–*-120-*-*-P-*-ISO8859-1” to type FontStruct
Warning: Cannot convert string “-*-Helvetica-Medium-R-Normal–*-100-*-*-P-*-ISO8859-1” to type FontStruct
Warning: Cannot convert string “-*-Helvetica-Bold-R-Normal–*-120-*-*-P-*-ISO8859-1” to type FontStruct
EXECUTE STEPS
number of steps doable or running: 4 at Thứ hai, 05 Tháng hai năm 2018 21:16:28 +07
doable: LM:toy:tokenize
doable: CORPUS:toy:get-corpus
doable: EVALUATION:test:input-from-sgm
doable: EVALUATION:test:reference-from-sgm
something is wrong with get-corpus-script
Có thông báo là “something is wrong with get-corpush-script”. Em đã thấy dòng get-corpus-script ở dòng 112 trong file config.toy, dòng này bị comment và em không thấy anh hướng dẫn config dòng này ạ. Em nghĩ vấn đề của em liên quan đến 3 dòng này trong file config.toy. Anh giúp em sửa lỗi này với ạ. Em cảm ơn anh!
LikeLike
Tiện thể anh có thể gửi em file config.toy, folderA mà ạnh đã chạy thành công moses đẻ em có thể tham khảo được không ạ ? Em cảm ơn anh
LikeLike
Rất tiếc là mình chạy phần này cách đây 2 năm, hiện tại không còn lưu dữ liệu gì. Mình hiện tại khá bận và chắc chỉ thực nghiệm lại sớm nhất 2 tháng nữa. Bạn thử tiếp tục dò lỗi xem sao.
Lưu ý là lúc chạy “python getFile.py”, thì trong arg.txt số dòng bạn chia phải có tổng bằng số dòng trong 2 file source hoặc target nhé.
Chúc bạn may mắn.
LikeLike
Vâng để em tiếp tục dò lỗi xem sao ạ. Cảm ơn anh và bài viết rất nhiều ạ, nó đã giúp ích cho em rất nhiều ạ. Cảm ơn anh và chúc anh một năm mới an khang thịnh vượng ạ!
LikeLike
Anh ơi, cài moses có phụ thuộc vào phiên bảo ubuntu không anh? Hồi anh cài là ubuntu mấy thế anh?
LikeLike
Hồi mình cài là Ubuntu 12 LTS, nếu không lầm. Mình không cho rằng phụ thuộc lắm vào version của Ubuntu, nhưng hồi đó có gặp 1 chút rắc rối về package với Ubuntu 14 LTS thì phải, nhưng vẫn giải quyết được sau khi google 😀
LikeLike